
Repair by replacing authorized unserviceable items.
Skid Assembly/
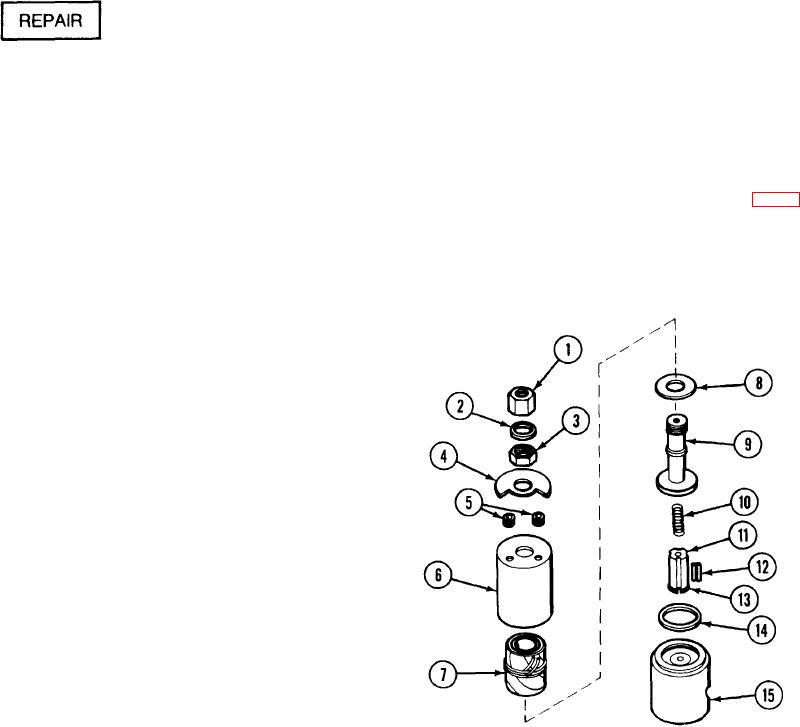
If the solenoid valve is sluggish during energization
Unscrew and remove coupling (1), preformed packing (2), and nut (3).
Solenoid valve coupling (1)
and deenergization, disassemble it. Inspect the
Remove data plate (4), grommets (5), housing (6), and solenoid coil (7) as
Preformed packing (2)
solenoid valve for dirt and wear of the piston and bore.
a unit. Remove coil insulating washer (8).
Nut (3)
Dust particles or foreign matter might prevent the seal
Data plate (4)
from sealing tightly. Disassembly and reassembly pro-
Using fabricated tool, remove DC sleeve assembly (9). Remove
Grommets (5)
cedures require the use of the fabricated air cylinder
spring (10), plunger seat (11), two pins (12), plunger (13), and seal (14)
Housing (6)
nut (fig D-2).
from body (15).
Solenoid coil (7)
Coil insulating washer (8)
Replace the solenoid valve if it does not work cor-
Using a lint-free cloth, wipe all the solenoid valve parts clean.
DC sleeve assembly (9)
rectly after being serviced.
Spring (10)
Assembly is the reverse of the above disassembly procedures.
Plunger seat (11)
Pins (12)
Plunger (13)
Seal (14)
Body (15)
TM 3-4230-209-30&P
2-203