T.O. 33B-1-1
5-64
5.4.2.3
Fabrication of Reference Standards.
a. The reference standards shall contain unbonds equal to the sizes of the minimum rejectable unbonds for
the test parts. Information on minimum rejectable unbond sizes for test parts shall be obtained from the
prime depot level engineering activity.
b. Producing unbonds by use of grease, vinyls, and other foreign material not covered below is prohibited.
One or more of the following techniques shall be used in fabricating reference defects. Since bonding
materials vary, some of the methods may not work with certain materials.
(1)
Standards for Types I, II, III and IV unbonds may be prepared by placing discs of 0.006 inch
thick (maximum) Teflon sheets over the adhesive in the areas selected for unbonds. For Type II
unbond, place the Teflon between the core and adhesive. Assemble the components of the
standard and cure the assembly.
(2)
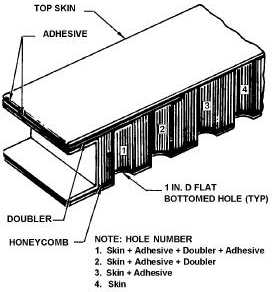
Types I, II and III standards may also be produced by cutting flat-bottomed holes of diameter
equal to the diameter of the unbonds to be produced. The holes are cut from the backsides of
bonded specimens, and the depths are controlled to produce air gaps at the applicable interfaces
(see Figure 5-66). When using this method, patch plates may be bonded to the rear of the
reference standard to cover each hole and seal the reference standard.
Figure 5-66. Example of Reference Standard for Types I and II Unbonds.
(3)
Type II standards may be produced by locally undercutting (before assembly) the surface of the
core to the desired size unbond. The depth of undercut shall be sufficient to prevent adhesive
flow, causing bonds between the undercut core and the skin.
(4)
Type IV standards may be produced by removing adhesive in selected areas prior to assembly.
(5)
Type V standards may be produced by drilling small holes in the back of the standard and
injecting varying amounts of water into the cells with a hypodermic needle. The small holes can
then be sealed using a small amount of water-resistant glue or adhesive.


